Nov 28, 2007

Set the compiz and kiba-dock up...

We can not say no when Microsoft Windows Vista released, it was something. Vista offers animated desktop which were able to run smoothly and well since Vista required higher resources such as processor, RAM, Harddisk and display card.
It seemed that Linuxers do not want to be left behind in animating the desktop. Even more that that, Linux can also looked like Mac OS X Leopard (read on mac4lin_make_linux_look_like_a_mac).

To make my desktop looks like Vista, I used compiz and kiba-dock, and i would like to share how did i do that.

  1. go to Applications - Add/Remove
  2. search : compiz show : all available applications
  3. check on Advanced Desktop Effects Settings
  4. click apply and wait until it's finished and then close it
  5. go to System - Preferences - Advanced Desktop Effects Settings -- to set the compiz
  6. go to Application - Accesories - Terminal
  7. type : sudo gedit /etc/apt/source.list
  8. go to the end of file and add these two lines
  9. deb http://download.tuxfamily.org/3v1deb feisty eyecandy
  10. deb-src http://download.tuxfamily.org/3v1deb feisty eyecandy
  11. save it and close it ( file - save and file - quit )
  12. type : wget http://download.tuxfamily.org/3v1deb/DD800CD9.gpg -O- | sudo apt-key add -
  13. sudo apt-get update
  14. sudo apt-get install kiba-dock
  15. sudo apt-get install kiba-plugins
  16. sudo apt-get install kiba-dock-dev
  17. go to Applications - Accessories - kiba-setting to set kiba-dock
  18. go to Applications - Accessories - kiba-dock to activate it


If you want to load compiz and kiba-dock during start-up, then you have to put them in the session

  • go to System - Preferences - Sessions
  • click Add button
  • name : compiz (adjustable)
  • command : compiz
  • comment : (up to you)
  • click OK button
  • click Add button again
  • name : kiba-dock (adjustable)
  • command : kiba-dock
  • comment : (up to you)
  • Click OK button
  • you will see both of them in the session and checked

Addition :

If you do not want to use kiba-dock, you can use Avant Window Navigator, for getting AWN, you should go to http://download.tuxfamily.org/syzygy42/pool/gutsy/avant-window-navigator/ then, you have to download and execute below files sequentially;

  • libawn-bzr
  • phyton-libawn-bzr
  • awn-core-applets-bzr
  • avant-window-navigator-bzr
After that go to System - Preferences - Awn Manager to set it up.

Happy docking !!

~E~

AVG for Linux

AVG is an Antivirus application which can we use for free. It was developed by Grisoft company

For more Information --> http://free.grisoft.com/
to download it (win) --> avg75free_503a1205.exe
to download it (lin) --> http://free.grisoft.com/doc/5390/us/frt/0?prd=afl
to update manually --> http://free.grisoft.com/doc/update/us/frt/0

I used the windows version on some machines and Linux (deb) version on mine. And this article was for the Linux one. I downloaded the avg75fld-r49-a1130.i386.deb first, the size was up to 42MB. Then i just installed it by double click on that file.
After the installation finished, go to Applications - Accesories - AVG for Linux Workstation to open the AVG panel. We can scan our files from this panel but i do not know how to clean and update the AVG using this panel.

In order to update and cleaning process, it can be done from Applications - Accesories - Terminal
  • Online update : sudo avgupdate -o
  • Download update : sudo avgupdate -d
  • Offline update : sudo avgupdate -f /home/username/Desktop
  • Virus Scanning : sudo avgscan -scan /media/win_c
  • Smart Scan : sudo avgscan -smart /media/win_c
  • Heuristic Scan : sudo avgscan -heur /media/win_d
  • Virus Cleaning : sudo avgscan -clean /media/win_d
  • type sudo avgscan -h or sudo avgupdate -h for more
To save the bandwidth, instead of downloading the update per units. We can download the update files onto one computer and then share it, so others can update AVG offline.


The way to do this :

  1. go to Applications - Accesories - Terminal
  2. type : sudo avgupdate -d ( wait until it's finished )
  3. type : cd /opt/grisoft/avg7/var/update/download and press Enter
  4. type : mv *.* /home/username/Desktop ( update files will be in the desktop )
  5. update this unit first; sudo avgupdate -f /home/username/Desktop
  6. close the terminal by typing exit
  7. go to desktop and copy *.ctl and *.bin onto a folder
  8. share that folder to others or put that folder to a sharing folder
  9. other units can copy this folder and do offline update from that folder
To update(online) automatically :
  1. go to Applications - Accesories - Terminal
  2. type : sudo vi /etc/crontab
  3. go to the last line and hit "i" button
  4. add a line --> 30 7 * * * root avgupdate -o (daily update at 7:30am)
  5. save crontab; press Esc and then ZZ <-- upcase z
I wrote this article for you who had Microsoft OS and Linux OS active dually in your computer. Just in case; if your Microsoft OS antivirus can not detect or clean a virus, you can scan and clean it from Linux by using AVG for Linux


~E~


Nov 19, 2007

Bring back the (missing) GRUB

This was happened when a friend of mine wanted to install PCLinuxOS into his machine. The installation was successful, but he came back a day after it and complained that his Microsoft Windows could not be booted. We decided to re-install the Windows even I minded with the fact that we have to re-install PCLOS also.

We installed Microsoft Windows into his machine, but I insisted not to re-installed his PCLOS. I went to Google and found a way to bring the Grub back, but in Ubuntu version. Since we just re-installed the windows, we decided to try this way out....no matter what it's cost !!

Thanks to our guts.......we succeeded in bringing the Grub back

Here's the steps;

  • boot by using Linux live CD, go to terminal and run -->> sudo grub
  • you're in grub menu now, then type -->> find /boot/grub/stage1
  • It will display your grub position, example (hd0,4) or (hd0,5)
  • Then type -->> root (hd*,*) -- ( replace the * with your grub position – (hd0,4))
  • Then type -->> setup (hd0)
  • The above statement will replace your windows MBR configuration
  • Then close the grub menu by typing -->> quit
  • Reboot your machine -->> sudo reboot
  • Above steps are only for Ubuntu clans, for others : without sudo


Thanks to ZIK for donating me this problem !
~E~


Nov 17, 2007

Windows Wireless Driver (ndiswrapper)

I have a friend who has a computer which can not connect to the wireless network but the wireless hardware is working well in windows ( his name is Martin )
Strange.......in windows it works but in Linux not. The hardware is ACER IPN2220 Card

How to solve this ? ( you may use online or offline solution )


Offline solution :

  1. we have install a program called ndiswrapper manually
  2. get 3 packages from http://packages.ubuntu.com and install them in order
  3. ndiswrapper-common
  4. ndiswrapper-utils
  5. ndisgtk
  6. In order to set up ndiswrapper, it is necessary to obtain the Windows driver for your wireless card. Generally, the best way to do this is from the CD supplied with your wireless card. You should copy two files to the same place on your computer, one ending in .SYS and one ending in .INF. If you find any files which end in .BIN, also copy those, let say copy them to home folder.

  7. go to System → Administration → Windows Wireless Drivers
  8. Click on install driver button and point to home folder, choose neti2220.inf and click ok to install it
  9. Click on Configure button to do the wireless setting.
  10. Reboot the machine or open terminal and do sudo /etc/init.d/networking restart
  11. Test the internet/network.
  12. later, you can type any to network name (ESSID) for automatically switch the access point


Online solution :

  1. connect to the internet by using wired connection.
  2. from the Linux desktop menu, go to applications – add/remove
  3. on the search bar, type ndiswrapper. Show : all available applications
  4. Check on the Windows wireless driver
  5. Click apply button and wait until it's finished
  6. In order to set up ndiswrapper, it is necessary to obtain the Windows driver for your wireless card. Generally, the best way to do this is from the CD supplied with your wireless card. You should copy two files to the same place on your computer, one ending in .SYS and one ending in .INF. If you find any files which end in .BIN, also copy those, let say copy them to home folder.

  7. After ndiswrapper installed and copied the .BIN, .INF, .SYS files to home folder, simply select
  8. go to System → Administration → Windows Wireless Drivers
  9. Click on install driver button and point to home folder, choose neti2220.inf and click ok to install it
  10. Click on Configure button to do the wireless setting.
  11. Reboot the machine or open terminal and do sudo /etc/init.d/networking restart
  12. Test the internet/network.
  13. later, you can type any to network name (ESSID) for automatically switch the access point

Done........now martin can connect to the internet wireless. ( I have the same experience with Atheros AR5007EG, pointing file was net5211.inf, for more about Atheros AR5007EG, find out here!

Thanks to Martin for donating me this case !
~E~


How to upgrade Edubuntu

I made this document after i did some Edubuntu upgrades from Feisty(7.04) to Gutsy(7.10)

In doing the system upgrade, there are 3 ways;

  1. Online upgrade from the Internet
  2. Offline upgrade from the latest version of Edubuntu CD(s)
  3. Re-install your Edubuntu.


1. Online Upgrade :

This method is not really a recommended one ( if you have problem with the bandwidth of your internet connection), because it will download a huge capacity of files from the internet, but if you have a good internet connection, maybe you can try this out.
Just go to Applications – Add/Remove and click on upgrade button and after that wait until all the processes finished

2. Offline Upgrade :

  1. Insert the latest Edubuntu bin-1 CD
  2. Autorun dialog box will appear and choose start package manager
  3. Click on Mark all upgrades
  4. Click Apply button
  5. When you asked about including online installation, choose NO for now, you can do this later
  6. Read the notification boxes, click next buttons to proceed
  7. Restart the computer
  8. Do edubuntu (offline) installation ( from main packages installation step).


3. Re-install your Edubuntu :

  1. Make sure that you do not have any document in your Linux partition.
  2. If you have, move all your Linux data to windows partition
  3. Do How to install Edubuntu ( can be combined with edubuntu (offline) installation.
  4. Finished ( you may restart the computer )


Happy Upgrade !!
~E~

Thanks to AZH, HEN, ERY


Edubuntu (offline) installation

I wrote this article based on my experience to introduce Linux(Edubuntu) here. When the demand of fresh installation was high and our internet connection has limited bandwidth which shared to whole campus, of course we met problem when we want to install some basic programs. Making a repository still far beyond my capability. But, I have to solve this problem.

What did I do ?
I searched ..... asked questions ..... finally I found http://packages.ubuntu.com which contains all Ubuntu clan's installation packages. I started to search NTFS packages, I typed down ntfs in the search box, and there was many ntfs packages. I picked one, executed it.........i found out that I have to consider about “dependencies”. So, base on this, I downloaded all packages including the dependent packages and I came out with the list below. My target is NTFS, XMMS, K3b, Gstreamers and flash-player ( get flash-player from here )

Purpose of this article is : you still can enjoy a fresh Edubuntu installation without having online and your unit will be ready for action.

You have to follow the steps of installation which you can find in how to install Edubuntu. But the last step that you have to do is : Restart time !! ( remove the CD from the tray )
Then continue with these; ( find and download the package from http://packages.ubuntu.com and execute it sequentially by looking at the list below );

Main Packages

  1. kdelibs-data
  2. kdelibs4c2a
  3. opera ( if you want to use the opera browser / optional )


NTFS

  1. dmsetup
  2. ntfs-3g
  3. ntfs-config
  4. after they're finished, go to System – Administration – NTFS Configuration Tool
  5. activate your NTFS by click on both check boxes


XMMS

  1. libgtk1.2-common
  2. libglib
  3. libgtk
  4. libmikmod
  5. xmms


K3b

  1. libdbus
  2. libflac++6
  3. libmpcdec3
  4. libk3b2
  5. libmad0
  6. libk3b2-mp3
  7. kdebase-bin
  8. libk3b-dev
  9. k3b
  10. k3b-i18n


Gstreamers ( 37 steps )

  1. gstreamer0.10-alsa
  2. gstreamer0.10-esd
  3. gstreamer0.10-ffmpeg
  4. gstreamer0.10-fluendo-mp3
  5. gstreamer0.10-fluendo-mpegdemux
  6. gstreamer0.10-gnomevfs
  7. gstreamer0.10-plugins-base
  8. gstreamer0.10-plugins-base-apps
  9. gstreamer0.10-plugins-good
  10. gstreamer0.10-tools
  11. gstreamer0.10-x
  12. liba52
  13. libcdaudio
  14. libdvdread
  15. libfreebob
  16. libgsm1
  17. libid3tag
  18. libjack
  19. libmms
  20. libmp4v2
  21. libmpeg2-4
  22. libschroedinger
  23. libopenspc
  24. libsidplay
  25. libsoundtouch
  26. libx264
  27. libxvidcore
  28. gstreamer0.10-plugins-bad
  29. gstreamer0.10-plugins-ugly
  30. gstreamer0.10-schroedinger_0.6.1
  31. libfaac
  32. libfaad
  33. libavutil1d
  34. libavcodec1d
  35. libquicktime1
  36. libmjpegtools0c2a
  37. gstreamer0.10-plugins-bad-multiverse


Flash-player : go to the extracted Flash_Player folder, then double click the flashplayer-installer file. Just follow the simple direction ( before you install flash player, make sure that you have open firefox once )

The last (can be done if you have internet connection) is to reload your installation packages


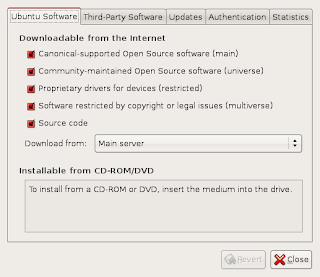
1.Go to System – Administration – Software Sources and mark on all boxes (see the picture)


2.After that, click close button and click on Reload button
3.Wait until the registration finished
4.Go to Applications – Add/Remove
5.When you asked to reload just click on Reload button
6.if not, you can search and download programs which you desired or install some program from the Add-ons CD (bin-2)


I hope this article can help people who has the same problem like mine.


~E~
Thanks to :
AZH for testing and listing Gstreamer and HEN for revising XMMS steps


Nov 15, 2007

I learned about "Cron"

Cron is a time based scheduling daemon in Linux ( not only in Linux anyway :D ) when I installed Linux, cron was already installed and ready to be used. The schedule run by cron not only single command but also can be expanded to many commands in a single script. So, at a time you just set cron to execute the script which consisted many commands.


For Example : I want to shutdown the internet connection every sunday and turn it on again on monday morning.....so in crontab ( cron configuration file, can be found in /etc ), I will put two cron syntaxes which turn off and turn on the network at that desired time.


For more info about cron :-->
http://en.wikipedia.org/wiki/Cron
http://www.unixgeeks.org/security/newbie/unix/cron-1.html
http://www.ussg.iu.edu/usail/automation/cron.html

Basic Syntax of cron :--> ( from wikipedia )

+---------------- minute (0 - 59)
| +------------- hour (0 - 23)
| | +---------- day of month (1 - 31)
| | | +------- month (1 - 12)
| | | | +--- day of week (0-6) (Sunday=0 or 7)
| | | | |
* * * * * command to be executed


each * can be replaced with my desired values, and not only with a single value
for example, if I want to do something every ten minutes ( ignoring the hour, DOM, month, DOW; means it will execute every ten minutes as long as the machine running ) so the syntax will be like this
10,20,30,40,50,0 * * * * command to be execute

If i want to do something every day at 23:59PM, the syntax will be like
59 23 * * 0,1,2,3,4,5,6 command to be executed or
59 23 * * 0-6 command to be executed

This syntax must be put in /etc/crontab

More examples :
I want to shutdown the internet every whole Sunday and The internet will back on Monday; so, I will add these lines to the server crontab
0 0 * * sun root services network stop
0 0 * * mon root service network restart

0 and 0 is for 00:00, two * mean any DOM and any month, sun and mon were the day that the commands will be executed

I want to shutdown the server on 24 Dec at 23:59 PM and the server will manually turn on after holiday
59 23 24 12 * root shutdown -h now

I want to run something at 3:10 am every day :-->
10 3 * * * root command

I want to run something at 12:10 on day 5 of each month :-->
10 0 5 * * root command

I want to do backup every new year :-->
1 0 * 1 * root backup.sh

~E~

How to install edubuntu

Edubuntu is a Linux distribution which came from Debian - Ubuntu. This distribution was dedicated to educational environment. To install Edubuntu into our computer, at least we have the LiveCD. I always download 3 CDs every time it released the new one ( 1 LiveCD, 1 Server CD, 1 Add-on CD ). I used Edubuntu-7.10 ( Gutsy Gibbons ) now.

For further info about Edubuntu : --> www.edubuntu.org
For getting the ISOs : --> www.edubuntu.org/download
For Indonesian, it's better to get the ISOs from : --> http://tuma.ui.edu
Ship it can be ordered from : --> http://shipit.edubuntu.org


Now, let's start the installation process.

By holding the Edubuntu LiveCD, boot the computer and jump into the BIOS setting to set the boot sequence. It has to boot from CD ( make CD-ROM as the first boot ). After BIOS setting finished, save the latest change, put the CD into the tray and reboot the computer. Don't forget.....you have to prepare the partitions first. To prepare the partition, you can read here.

Choose "Start or install Edubuntu" at the menu, then wait until the booting process finish and the Edubuntu desktop appeared.
In this state, there are two things that i can do. First, exploring this desktop, second....jump to the installation process.

To start the installation, Double-click on the install icon

Now.........Here's the installation menu ( 7 steps )

1 of 7 : Welcome screen ( Just by default; use English for installation language ) then click forward button

2 of 7 : Where are you ? ( select your city and time zone ) then click forward button

3 of 7 : Keyboard Layout ( Choose U.S. English for both panels ) then click forward

4 of 7 : Prepare disk space, Choose manual since we already prepare the partition and click forward button. Installation will display the partition structure and then click on an ext3 partition which we had made, Click edit partition, change the mount point to “/” then press ok button. Still on that partition, checked on the format box. Choose the next partition which we had made as swap, Click on Edit partition, change the type to swap and press ok, Click on forward button for the next steps

5 of 7 : Migrate documents and setting, just pass it on by clicking forward button

6 of 7 : Who are you ? ( type down your user name, password and computer name ) then click forward button

7 of 7 : Ready to install ( click install button ) Now i just have to wait until the installation finished and asked me to restart. press the restart now button


Restart time !! ( remove the CD from the tray )


After the computer restart. There are some action that we have to take to finish this installation.

1. set the network connection; Go to System - Administration - Network

2. Reload the repository server; Go to System - Administration - Software Source ( checked on every box then click close to reload the repository )

3. install the basic supporting packages; i will install NTFS Configuration Tool, GStreamers, K3b and XMMS. Go to Applications - Add/Remove; type down the package title and show at all available applications ( check on the related applications and then press apply button to download and install it ) - for this item, i have an alternative way here.

4. install the add-ons applications which can be done from Add-Ons CD or if you need more programs you can to go Applications - Add/Remove (show : all available applications).

I am finished with my Edubuntu installation !!


~E~

Partition Manager

Everybody who wanted to split the drive into some partition will use this kind of program. Last time, i just only knew that we can divide the disk using fdisk at the beginning of windows installation. But know…….there are so many partition managers we could find on the Internet. Licensed or free one.

I used Gparted now, i like this because it is LiveCD and free, i just have to boot from the CD ( or even Flashdisk ) then i can manage the disk partition.
For detail info about GParted : –> http://gparted.sourceforge.net/
For getting the LiveCD / Flashdisk : –>http://gparted-livecd.tuxfamily.org/

How to use GParted ? ( i wrote this based on my own experiences )

I had a computer with a 60GB disk and i already had Windows XP on it, i wanted to add a data partition, a linux partition and of course a swap partition.

Firstly, i downloaded the LiveCD ISO and burned it to a CD, then set the computer to boot from the CD ( BIOS Setting ). Insert the CD into the tray and start to boot. A “grub like” screen will appear and just press enter to run the default option ( the first menu ). From here, i just have to wait until the Gparted window appears. If there is a question appears, just press the enter to choose default option.

Next, i faced the GParted panel and i have to make sure that the partition has a boot flag. If there was no boot flag….don’t continue at least this is an empty drive. I had a bad experience about this…..loose everything since i pushed an un-flag partition.

- right click on the partition and choose resize/move, resize it to 15GB ( this will shrink my windows partition )

- the partition was shrink now and had another new partition appeared, right click on the new empty partition, choose new, make it as logical, resize to 35GB and the type is NTFS ( for all data )

- right click on the next new partition, choose new, make it logical, resize to 8.9GB and the type is ext3 ( for Linux partition )

- right click on the last new partition, choose new and make it as swap

- Let GParted finish the job by click on apply button at the menu panel

- Wait until GParted finished and then restart the computer.

- My disk had divided to 4 partitions


Next, i want to install Edubuntu into my unit. This article continued by this link.

~E~

ACER Aspire 4520 tried to kill me......(2)

I started to work on this unit since September 2007, tried to pump the Linux in. I have tried to install many distros; the result was failed and failed again. I considered this as a trigger for m to keep pushing myself harder in knowing about Linux. I didn't want myself just as a Linux installer, i wanted more.

I have tried to install PCLOS2007, Vector, DreamLinux, OpenSuse, Skole, Slackware, Mandriva, IGOS to this laptop. But...like usual, it kept rejecting them. The last; i returned to edubuntu-7.04 again. I asked questions to edubuntu-users@lists.ubuntu.com about my problem. Any Linux that i installed on can not display a good graphic (graphic card problem), can not connect to the wireless and it's mute (sound problem).

One of edubuntu users told me that i have to force this unit to run in save graphical mode by edit /etc/X11/xorg.conf, go to the Device stanza for your video card and change the driver to vesa, eg:

Section "Device"
Identifier "ATI Technologies, Inc. ATI Default Card"
Driver "vesa"
BusID "PCI:3:0:0"

EndSection

Then do sudo /etc/init.d/gdm restart

Actually, an alternative and possibly better way to do this is to run:
sudo dpkg-reconfigure xserver-xorg

You will be led through a series of menus. Take the default answer to all questions (there are quite a few), except where you are asked for the "X server driver", when you should choose "vesa". Once that's done, try restarting the display manager

sudo /etc/init.d/gdm restart

yes, it worked....in safe graphic mode, but it didn't satisfied me.

~*===E===*~


Two months passed by, slowly i found out the way to solve this problem. I used Ubuntu-7.10 (Gutsy Gibbon) and after searched for the answer at https://ubuntuforums.org and waiting from edubuntu-users answers. I can settle it down.


Here is the way out;


How to set the display ( nVIDIA 7000M )
go to Applications - Add/Remove
type nvidia and choose : nvidia binary X.org driver ('new' driver )
click on apply button and wait until the installation finished
go to system – Restricted Drivers Manager – enable the NVIDIA
open terminal
type sudo vi /etc/X11/xorg.conf
replace the resolution manually from “1024x768” to “1280x800”
reboot the computer

How to set the wireless ( Atheros – AR5007EG )
download the AR5007EG windriver
install ndiswrapper manually
open terminal; type sudo rmmod ath_pci (remove the pci module)
type sudo vi /etc/modprobe.d/blacklist-common
insert : blacklist ath_pci (to put ath_pci in blaklist mode)
save it and restart the computer
extract the windriver into one folder (ex : documents)
go to System – Administration – Windows Wireless Drivers
install net521.inf
click configure button and set it up
open terminal; type sudo ndiswrapper -m (to load ndis on restart)
reboot the computer
later, you can type any to network name (ESSID) for automatically switch the access point

How to set the sound (Realtek High Definition Audio a.k.a Realtek ALC268)
install linux-backports-modules-2.6.22.14-generic
install linux-backports-modules-generic_2.6.22.14
open terminal; type sudo vi /etc/modprobe.d/alsa-base
insert : options snd-hda-intel model=acer
reboot the computer

By November 05, 2007, i finished my long journey to make ACER Aspire 4520 runs in Windows XP and Ubuntu Gutsy Gibbons, as an addition; this laptop was Vista design.. :D

~E~

ACER Aspire 4520 tried to kill me......(1)

My supervisor wanted to buy a new laptop since her old one cracked at the screen flip. She asked my suggestion about which laptop that suit her need and her budget. So, based on those, I tried to make a list consisted of some laptops. Without telling me anything, she tried to find by herself too.

After one day passed by, we met again and after struggling in deciding her chosen one, we met an agreement that she should buy Acer Aspire 4520 without an Operating System on it since she will use Linux onto it. By this time….we just started to socialize Edubuntu here.

This laptop important specifications were

Processor : AMD Turion 64 X2 Mobile Technology TL-58 ( 1.9GHz, 1MB L2 cache )
Chipset : NVIDIA nForce 610M ( MCP67-MV )
RAM : 1GB DDR2 667MHz
Graphic : NVIDIA GeForce 7000M
Wireless : Atheros 5007EG
LAN : GigaByte
Sound : Realtek High Definition Audio
Hard Drive : 80GB
Additional : Card Reader, WebCam, DVD-Super Multi, Bluetooth

She called the store and agreed about the price and everything, including ship it to our place ( nowhere of sugarcane fields ). We just have to wait for about three working days and the package came. Later, this package became a great nightmare of mine…..!!!!

I started to work on this 4520, I formatted first and make new partition tables on the disk. After that, I tried to install a Linux distro which was Edubuntu-7.04 on it. Amazingly…….stucked at the beginning. I assumed that maybe this variant was too old to be installed in this new laptop. Then I switch to install thi laptop with Microsoft Operating System. I tried XP first, It worked okay until I found out that there was no driver at all. The provider included an installation DVD in the package, but…it’s for Vista ( huaaaa…..i am in misery now )

I tried to find a vista cd ( trial version ) everything was fine and all drivers worked. But the owner of this laptop complained that she would not buy a Vista….she will use Linux on it or at least XP on it. Damned……..I installed XP once again to this laptop. Then jump to the Internet to find a solution about my problem.

Finally, I found a way out………after couple of days; XP graphic driver was taken from http://komku.blogspot.com/......
and the rest of drivers taken from http://www.acer.com.cn/......

My ass is temporarily safe now, at least she can work with her new laptop even in XP environment. Since this day, she kept asking about installing Linux onto her laptop. And since this day…i started my long journey to solve this.

Next Mission : Pump a Linux into Acer Aspire 4520

~E~

My First Writing

After so long time, finally i can create a blog.Before i started to make this blog, i didn’t even care about a thing called “blog”. I don’t know why……? But after time passed by, i found out that a blog can help some people in searching for something that could be useful to them. I stated that because it’s based on my own experiences.

Since i moved here, in middle of nowhere, i have difficulties in updating my knowledge. I am so lucky since my institution provided us with 24-hours Internet connection. For me, this is like jump directly to heaven even until now, people around me still confuse about “is the Internet useful or not ?”. For me, it depends on that person itself. If they want a bad thing; Internet provides it, if you want a good useful thing; Internet also provides it.

I started to look at a blog ( accidentally ) when i had difficulties in working with Edubuntu and setting up the wireless connection here. I found the sollution of my problems on a blog. From that point, i started to think about “should i make a blog, too ?”

Next thing was, I like to record every problems that i solved into a journal. This journal is personally mine. I also think about “what if i share my journal ?”

Now, you can see that i am blogging!. I made this blog to help people like what other people helped me from their blog, also to publish my journal contains about some little things that i solved through bloody-sweat try an errors and also maybe i will put personal stories of mine, my family, friends and foes.

I think this is enough as my first writing….i am thinking about adding my blog items now

~E~